Coot Workshop
Part 2 - Building From Scratch
- Introduction
- Starting
- Baton Building
- Convert to Mainchain
- Assign Sequence
- Build Another Molecule
- Finishing Touches
1. Introduction
This tutorial is a slightly modified copy of this one from the Coot website. It assumes you are familiar with the concepts covered in part 1 of the workshop.
Due to advances in structure prediction (e.g. AlphaFold), building a model from scratch is very rarely needed. However, if structure prediction and automatic building both fail then building the molecule "by hand" may be the only way to proceed. It is also a good exercise to familiarise yourself with the shape of main-chain and side-chain density.
Note that this tutorial map is an easy map to build into, the side chains are (mostly) clear. Using just a map and a sequence, we will attempt to generate a model. This model can then be validated and refined with Refmac for several rounds. With some experience you should be able to get an R-factor better than 20% in less than 30 minutes.
2. Starting
Open Coot, then click
Calculate / Load Tutorial Model and Data
to load the structure.
It has two chains with 96 residues in each.
Start by going to the C-alpha (CA) of residue 2 in the A chain.
The idea is to build the complete A chain in the forward direction.
Make a note of the position of the C-alpha in residue 1 then
hide the molecule in the Display Manager
until you have finished building, validating and refining.
You should also hide the difference map
because we are not interested in the previously built model.
The backbone trace through the density
can be more easily visualised
by using a skeleton map.
Go to Calculate / Map Skeleton
and change it to On.
3. Baton Building
We will now start to “baton build” the map.
Go to Calculate / Other Modelling Tools to open another toolbar
and click C-alpha Baton Mode.
A set of controls will appear,
as well as a white baton
and a set of pink points that show possible places for a C-alpha
that are 3.8 Å away from the current position.
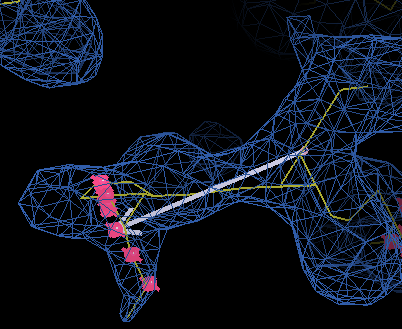
When you start, you are placing a CA at the baton tip for residue 1 (the N-terminus). After placing CA for residue 1, you will get a choice of positions for residue 2, which is currently at the centre of the view. This might seem that you are doubling back on yourself, which can be confusing the first time, but it is useful for extending existing chains.
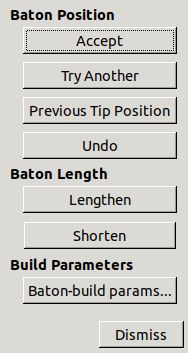
Press Try Another and Previous Tip Position
to cycle through the points,
Lengthen and Shorten to change the baton length,
and Accept to place a CA and move onto the next residue.
If none of the guide points are suitable
you can use b to toggle baton swivel mode.
If you have installed the template keybindings
(through Edit / Settings)
then you can use the shortcut
A (Shift-a)
to accept the baton position.
Build from the N-terminus to the C-terminus.
There are 96 residues to build and it takes about 15 minutes or so.
If you make a mistake you can press Undo
to move back one residue.
The residue at the C-terminus is a cysteine that forms a disulphide bond.
Click Dismiss on the baton controls when done.
There may also be a molecule called Baton Atom Guide Points
that needs deleting.
4. Convert to Mainchain
Now we need to turn these CA positions into mainchain.
Use Ca Zone -> Mainchain
in Other Modelling Tools
and click one of the baton atoms.
You will need to wait several seconds while it builds
(note that you need at least 6 residues for this to work).
Two new molecules will be created that are traced in different directions.
We know the forward direction is correct
(see how much better the carbonyls fit)
so mainchain-backwards and Baton Atoms
can be deleted.
The backbone now needs to be tidied up.
Go to Calculate / All Molecule / Stepped Refine,
pick mainchain-forwards
and watch it as it goes.
Is it making mistakes?
That refinement may have gone to quickly to make a note of problem areas.
Use Validate / Density fit analysis
and real space refinement to correct anything that's wrong.
Also use Edit / Change Chain IDs to label this chain as A.
5. Assign Sequence
One option for assigning the sequence is
to use Mutate Residue Range
but this is only useful if you know the identity for all the residues.
If we know the sequence for the whole chain
but have only built part of it
then we can also ask Coot to assign the sequence for us.
Go to Calculate / Assign Sequence / Assign Sequence (py)
to get the following window:
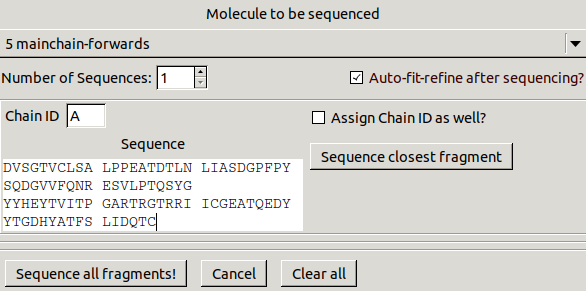
Select mainchain-forwards to be sequenced,
turn on Auto-fit-refine after sequencing?,
change Chain ID to A
then copy and paste the following sequence:
DVSGTVCLSA LPPEATDTLN LIASDGPFPY SQDGVVFQNR ESVLPTQSYG
YYHEYTVITP GARTRGTRRI ICGEATQEDY YTGDHYATFS LIDQTCSequence closest fragment.
Coot will think for several seconds while assigning the sequence
before trying to fit the side chains.
The sequencing may fail depending on how good the model is.
You need to make sure the CBs are in density
and pointing in the right direction
and the fragment is long enough.
Use Draw / Sequence View to look for
alanine residues that don't match the sequence
(possibly at the termini)
and mutate them into the correct residues
(or delete them if they are extra).
6. Build Another Molecule
Now we need to build another molecule (the NCS related copy).
We will first just build a small part.
Search around to find a helix not already built
(and not a crystallographic symmetry copy of the chain already built).
This may be easier using the map skeleton with the side chains pruned.
Then use Place Helix Here
in Other Modelling Tools
to place a helix in the density.
Make changes to the helix so that it fits the density well,
then assign the sequence (and residue numbers) and fit the side chains
using the Assign Sequence (py) tool again.
Now we will superpose a copy of the A chain onto this helix.
Go to Calculate / LSQ Superpose:
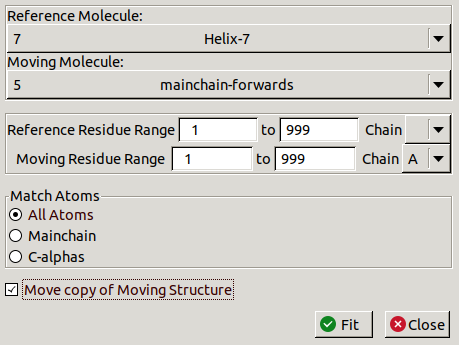
Make sure you are moving a copy of chain A onto the new helix.
A new molecule should appear that almost fits the density.
To clean up the fit with a rigid body refinement,
first click Rigid Body Fit Zone in the refinement toolbar
then click the N-terminus and C-terminus.
Then perform a stepped refinement of the whole molecule and merge the the copy
back into the original mainchain-forwards molecule.
Instead of building part of the next chain and superposing, it is also possible to find and fit a copy of a chain using map masking and Jiggle-Fit tools as shown in the following video:
After the new chain is merged,
Coot should detect that the A and B chains are NCS copies of each other.
Now you can use the shortcut o
to quickly switch the view between NCS copies.
Also, if you make changes to one chain and want them copied into other chains
you can do this using
Copy NCS Residue Range and Copy NCS Chain
under Calculate / NCS Tools.
7. Finishing Touches
If you want to finish the structure you've built from scratch, go through rounds of validation and model building using Coot and refinement using REFMAC in CCP4i2. Then waters need to be built as well as a ligand (3GP).
Paul Bond, University of York, paul.bond@york.ac.uk